


 Sonar Tracker
Students
Import student data
Student data tells Sisra Analytics who is in a cohort, which classes they are taught in and their filter values, such as SEN. Sisra has no live link to your MIS, so you export a file from the MIS and import it here. Import a new file whenever classes, filters or the roll change, then publish student data.
Before you start
Section titled “Before you start”You need:
- an authority group with Access Data Section, such as Admin
- the Student Data Profile set up, because the file needs every column in it
- at KS3/4, the key stage boundaries checked in CONFIG, under Key Stages
Authority groups and permissions explains Access Data Section.
Prepare the file
Section titled “Prepare the file”One file holds one cohort, with a row for each pupil or student in each class. A pupil taught in 6 classes has 6 rows. The file needs a header row, and should have every column in the Student Data Profile. Its column names can differ from the profile’s, because you match them when you import. Sisra ignores any extra columns.
| Column | What to put in it | Up to |
|---|---|---|
| StudentID | The ID that links this person’s grades and baselines. Sisra checks that it contains a number | 20 characters |
| StudentName | The name the reports show. Sisra checks that it contains no numbers | 60 characters |
| Subject | The set of classes, such as English. It need not match a qualification’s name | 60 characters |
| Class | The teaching group, such as 11EEn1 | 30 characters |
| Filter columns | One value per person, the same on every row, such as Y or N | 40 characters |
| Staff initials (optional) | The class teacher’s initials. A class with two teachers needs a row for each | 5 characters |
Every row needs a Student ID and a name, or the import stops. Fill in Subject and Class on every row too: for someone on extended leave, enter a placeholder class. Keep set names the same from one file to the next: Art in one file and Ar in the next makes two sets of classes. For a carousel or rotation, give each qualification’s classes their own set name, and import a new file at each change.
Save the file as .csv, .xlsx, .xls or .xml. You do not need the Sisra Excel Add-In. In a .csv file, do not write names as surname, comma, forename: the comma starts a new column, so the rows no longer line up. Use a space or a semicolon instead.
Choose the Student ID
Section titled “Choose the Student ID”Sisra links everything for a person by their Student ID: student data, baselines and grades. Use the same ID in every file for the cohort, from the first import to results day.
- Use an ID that never changes, such as the exam number or the admission number. In SIMS, the exam number is on the results download from SIMS Examinations.
- Avoid the unique pupil number (UPN). Juniper Education’s SIMS guides call it sensitive information and advise against it for new cohorts.
- If your school changes MIS, carry the Student IDs across. If they change, match old IDs to new ones with VLOOKUP in Excel, so each person keeps one ID in each cohort.
Export from your MIS
Section titled “Export from your MIS”Juniper’s support team does not support MIS exports, so ask your MIS supplier if an export will not run. Export one year group at a time.
| MIS | How to export |
|---|---|
| SIMS | Juniper provides a report definition, ‘SISRA Analytics Students Report’. Import it with Reports, then Import, and add your own filters with Reports, then Design Report. Run it to Excel with Reports, then Run Report. Untick Suppress duplicates, or rows will be missing. For an earlier year, set an effective date instead of Bypass Effective date (Use Today) |
| Arbor | Arbor’s own help centre article, SISRA Analytics, explains its report template. Skip its Excel Add-In step and import the Excel file as it is |
| Bromcom | There is no report definition. Build a report with the columns in your Student Data Profile. The BromCommunity forum can help |
| iSAMS | Sisra’s exports reach iSAMS schools through iSAMS’s update system. They are not allocated to users at first, so allocate them before you run them |
The SIMS report definition and Juniper’s guides for each MIS are in Juniper’s help centre. Get support and training explains how to reach it.
Import the file at KS3/4
Section titled “Import the file at KS3/4”- Select DATA. In Key Stage, choose 3/4, and in Year 11 in, choose the cohort.
- Select Students, then Import, then Student Data.
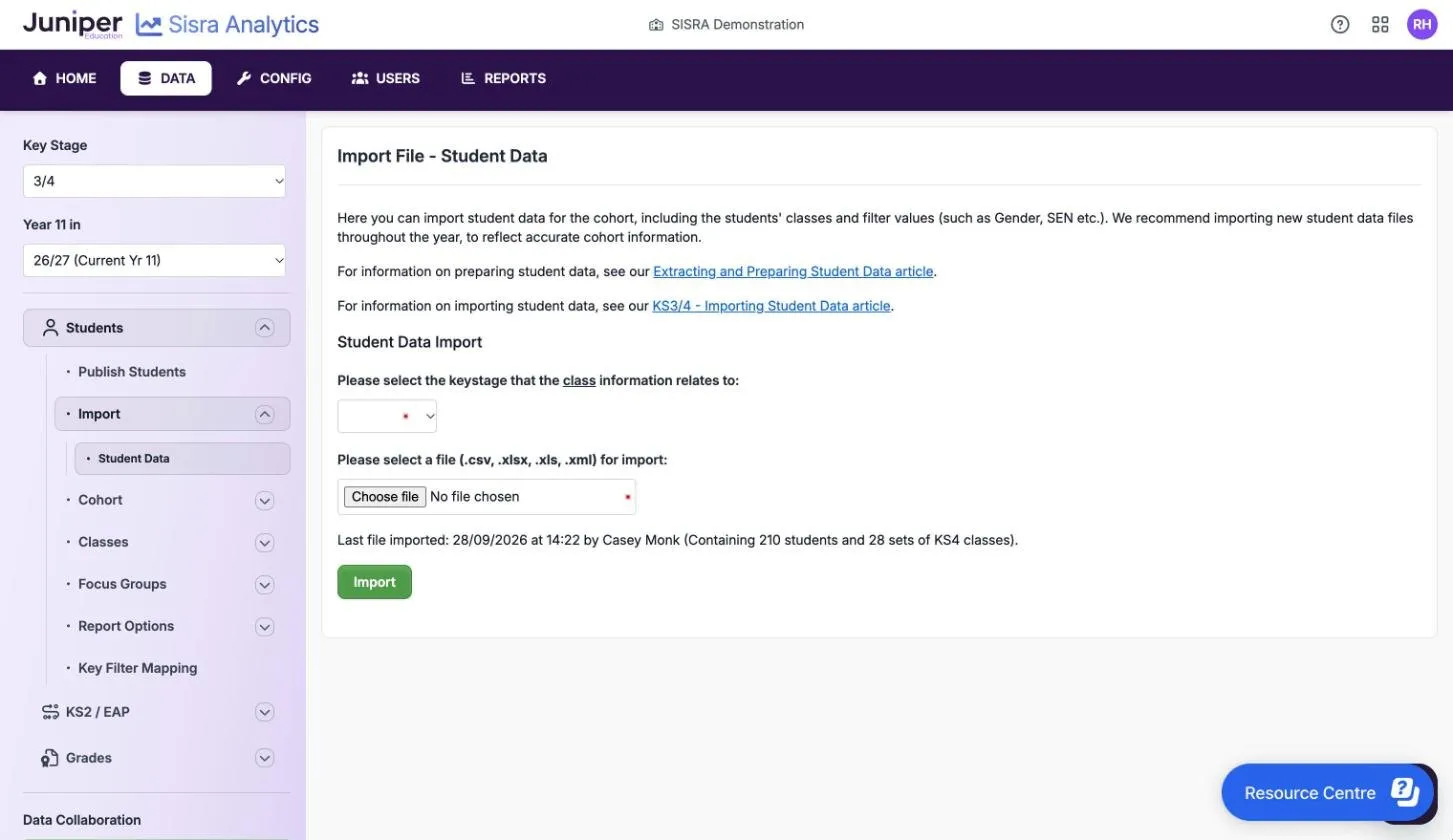
- In Please select the keystage that the class information relates to:, choose 3 or 4.
- Choose the file, then select Import.
- On Column Mapping - Student Data, check that each column in the profile is matched to a column in your file.
- Select Continue with the import.
- Choose the import options. They appear from the cohort’s second import on. See Choose the import options.
- Read the file health check and the summary of pupils and subjects. See Read the file health check.
- Select Complete the import. The Students List opens.
On the mapping page, Sisra matches the columns whose names match the profile, or reuses your last mapping. Match any others by hand, such as Reg Group in your file for Registration Group. For a filter that is not in the file, choose ** USE DEFAULT VALUE **: everyone in the file then gets the filter’s default value. To import staff initials, tick Include Staff Initials and choose their column. If forenames and surnames are in separate columns, tick Student forename/surname in separate columns, then choose Surname first or Forename first.
Sisra keeps KS3 and KS4 classes apart, so choose the key stage carefully. KS3 reports show each pupil’s latest KS3 classes, and KS4 reports their latest KS4 classes. Under the form, Last file imported: shows when the last file was imported, by whom, and which key stage’s classes it held.
Import the file at KS5
Section titled “Import the file at KS5”KS5 works in the same way, with these differences:
- in Year 13 in, choose the cohort
- in Please select the year that the student data relates to:, choose Year 12 or Year 13
- current year 13 and leavers cohorts need two files: year 12 data with the year 12 classes, and year 13 data
- the year you choose decides students’ statuses, such as Year 12 Only, as Statuses at KS5 explains
- the summary has blue buttons that list who will get each status
- Update Statuses: is locked for the first file of each year in a cohort
- imports never change the statuses you set by hand: Guest, On Roll Aged 18, Year 12 Addback and Year 13 Only Aged 18
Choose the import options
Section titled “Choose the import options”From a cohort’s second import, Sisra asks three questions. At KS3/4, Update Statuses: is a tick box: tick it for Yes. The first KS3/4 file for each key stage adds all its classes without asking about them. New pupils and students are always added, with their classes and filter values, whatever you choose.
| Option | Yes | No |
|---|---|---|
| Update Classes: | Replaces the classes for the key stage or year you chose with the classes in the file, from the next time you publish student data | Keeps the classes Sisra already has |
| Update Filters: | Updates the filter values of everyone in the file. The new values reach the reports when you publish student data | Ignores filter changes. New people’s filter values are still added |
| Update Statuses: | Treats the file as the whole cohort. At KS3/4, anyone missing from it becomes Left School, and anyone in it who had left comes back on roll. At KS5, see How imports set KS5 statuses | Leaves statuses as they are |
| You are importing | Update Classes: | Update Filters: | Update Statuses: |
|---|---|---|---|
| The whole cohort, up to date, such as at the start of the year | Yes | Yes | Yes |
| New joiners only | Yes | Yes | No |
| The whole cohort as at the spring census | No | Yes | Yes |
| One key stage’s last file again, to restore its classes | Yes | No | No |
Read the file health check
Section titled “Read the file health check”Sisra checks the file before importing it. Errors stop the import, but you can accept warnings. Show/Hide Errors and Show/Hide Warnings list the people concerned. Back to mapping returns to the column mapping, and Cancel the import stops so that you can fix the file.
In these messages, X stands for a number.
| Message | What to do |
|---|---|
| “X Student(s) that have at least one filter conflict.” | Someone has two values for one filter on different rows. Cancel, make the values match, then import again |
| “X Student(s) sharing X student id(s).” | Two people have the same ID. Correct the IDs in the file |
| “You may be using different Student ID’s to those already imported.” | Compare the file’s IDs with the student list before you continue |
| “X Student id(s) that does not contain a number.” or “X Student name(s) that contain a number.” | Check that the ID and name columns are mapped the right way round, then check the file |
| “The current cohort limit of 650 has been exceeded.” | The file may hold more than one cohort, or the wrong IDs. A cohort can have up to 650 people |
| “The file submitted does not contain valid data.” | The file has no header row or no data, or Subject or Class is blank for everyone |
| “Some rows in the file had more columns than others.” | A .csv file has commas inside values. Remove them, then import again |
When the file is clean, Sisra says: “No potential issues have been identified in your import file. Please check the Cohort Summary information below before completing the import.”
File health check messages lists the messages for every kind of file.
Publish the student data
Section titled “Publish the student data”The reports go on using the last published student data until you publish again.
- Select Students, then Publish Students.
- Select Publish.
At KS5, if statuses changed, republish every grades data set as well. Publish student data gives the details.
Import again during the year
Section titled “Import again during the year”Sisra never updates student data by itself. Import a new file:
- for each new cohort
- after classes change, such as at a rotation
- when attendance bands or other filter values change
- after the spring census, so that the cohort matches the DfE’s (see Check cohorts against the spring census)
- at the start of each school year, with all three options set to Yes (see Start a new academic year)
If something goes wrong
Section titled “If something goes wrong”Someone is missing after the import. Check that the file has a row for them with a Subject and a Class. In SIMS, check that Suppress duplicates was unticked.
“Some columns in the file are mapped to required fields, but contain blank values.” A row has no Student ID or name. Fill them in, or delete rows that hold no data, then import again.
You imported into the wrong cohort. In that cohort, import its own correct file with Update Statuses: set to Yes. The people imported in error become Left School, so delete them: see Delete a pupil or student. Deleting them does not affect any other cohort. Then import the file into the cohort it was meant for.
The Student IDs were wrong. Import the file with the right IDs and Update Statuses: set to Yes. Then delete the records with the wrong IDs, which are now Left School.
Classes are wrong after the import. See Fix classes after an import.
You chose the wrong key stage (KS3/4). Import the file again with the right key stage. Then import the other key stage’s last file with Update Classes: set to Yes and the other two options No.
Update Statuses cannot be changed (KS5). It is locked for the first file of each year in a cohort.
The file has more than 650 people. Check that it holds one cohort only. Juniper can raise the limit for a large KS5 cohort to 2,500.