


 Sonar Tracker
Getting started
Get started as a Sisra administrator
This tutorial takes you through setting up Sisra Analytics in the order the work has to happen, until the first reports appear. Follow all of it for a new school. For a new cohort, such as a new year 7 or year 12, your school-wide settings already exist, so start at Choose the cohort.
Before you start
Section titled “Before you start”You need:
- the Admin authority group, or another group with Access Data Section
- an agreement with your senior leaders on which pupil and student characteristics to report on, which data sets to use and when to collect grades
- files from your management information system (MIS) or elsewhere: student data, KS2 or KS4 results, and grades such as targets
Sisra has no live link to your MIS. You export each file and upload it to Sisra as a .csv, .xlsx, .xls or .xml file. The Sisra Excel Add-In has not been needed since November 2024.
The Resource Centre on every page has a KS3/4 Onboarding Checklist and a KS5 Onboarding Checklist, under Training Checklists.
The order of work
Section titled “The order of work”| Step | Where | What it sets up |
|---|---|---|
| 1 | CONFIG | Student data columns, filters and grade methods for the whole school |
| 2 | DATA > Students | The cohort’s pupils or students, their classes and their filter values |
| 3 | KS2 / EAP (KS4 / EAP at KS5) | Baselines and Expected Attainment Pathways (EAPs) |
| 4 | Grades > Uploads | Grades in data sets and assessment collections |
| 5 | Grades > Matching | Each qualification’s EAP, grade method and national record |
| 6 | Students > Classes and Grades > Grades Management | Classes for each qualification, and checks on the grades |
| 7 | The three publish pages | The reports |
Work through the steps in order, because each depends on earlier ones. For example, you cannot create an EAP until the cohort has a baseline, and the Matching page opens only once the cohort has an EAP.
Set up CONFIG
Section titled “Set up CONFIG”Settings in CONFIG apply to every cohort, so you set them up once for the school.
Student data columns and filters
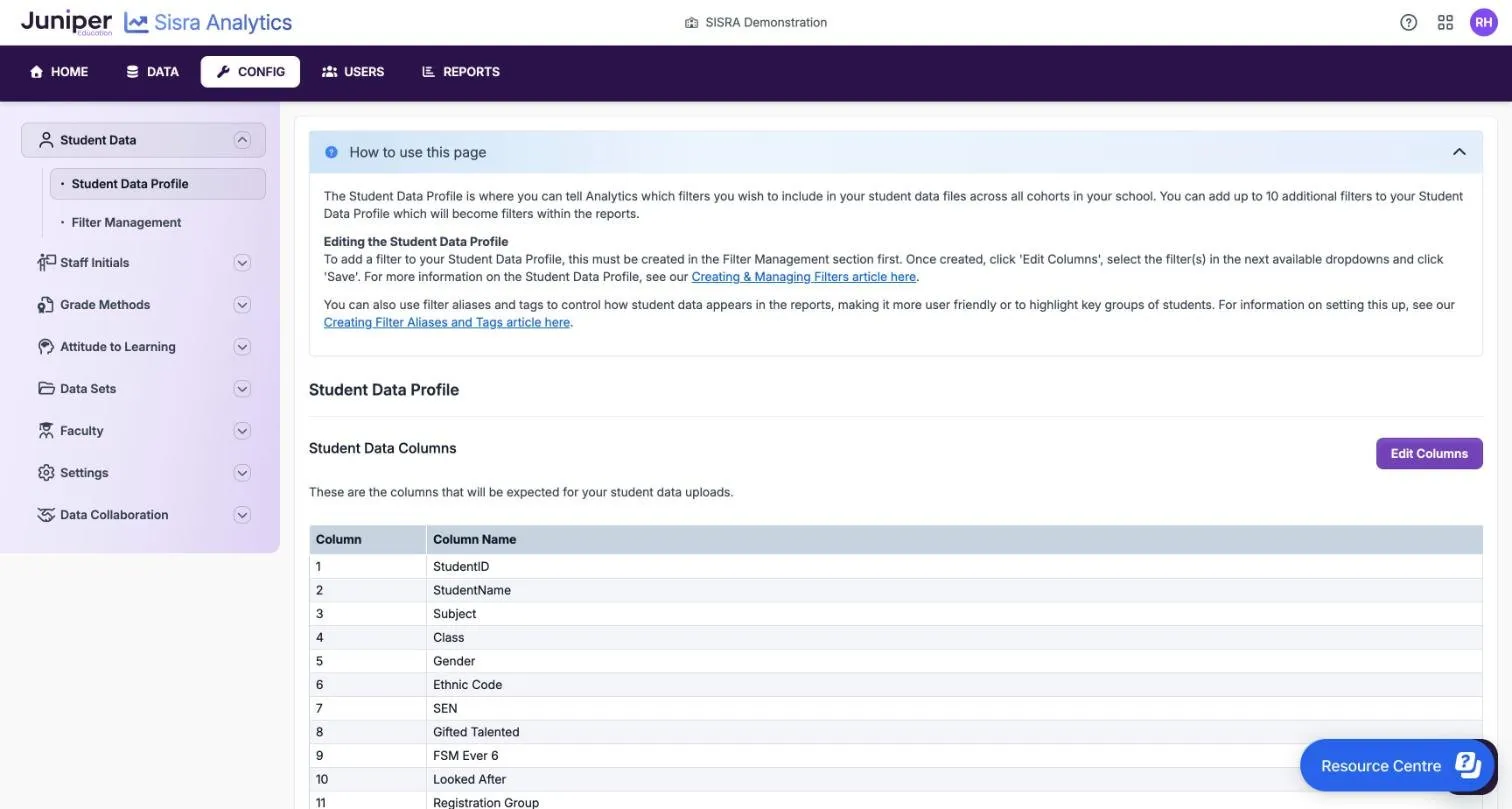
Section titled “Student data columns and filters”Every student data file must have the columns in your Student Data Profile. Ten are fixed, such as StudentID, Class and SEN. You can add up to 10 of your own filters, such as Disadvantaged or EAL, which become groups you can pick out in the reports.
- Select CONFIG, then Student Data > Filter Management.
- Select Create Filter, enter a Filter Name: and a Default Value:, and select Create.
- Repeat step 2 for each filter.
- Select Student Data Profile, then Edit Columns.
- Choose your filters in columns 11 to 20 and select Save.
The page’s Upload Format Example then shows the columns your files need. Set up student data columns and filters also covers aliases, which turn codes such as Y and N into readable names in the reports.
Grade methods
Section titled “Grade methods”A grade method lists the grades a qualification can have, with the points and entries each is worth. Check the methods already under CONFIG > Grade Methods before you create one.
For KS3/4, select KS3/4 Methods, then Create KS3/4 Grade Method. For KS5, select KS5 Methods, then Create KS5 Grade Method. Each KS3/4 EAP needs a method with Attainment 8 points for its exams term, so make sure each kind of exam grading has one. See Create grade methods.
Other settings
Section titled “Other settings”Check Settings > Key Stages only if your school’s KS3 is not years 7 to 9. You can leave these until later:
- data set names and faculties, under Data Sets and Faculty
- Attitude to Learning (AtL), if your school records it
- the colour theme and report defaults, under Settings
- Sisra Data Collaboration, under Data Collaboration
A data set’s name applies to every cohort in its key stage, so agree names with your senior leaders before you upload grades.
Choose the cohort
Section titled “Choose the cohort”From here on, you work on one cohort at a time.
- Select DATA.
- In Key Stage, choose 3/4 or 5.
- In Year 11 in (Year 13 in at KS5), choose the cohort, such as 26/27 (Current Yr 11).
The menu now shows the cohort’s three sections: Students, KS2 / EAP (KS4 / EAP at KS5) and Grades. Cohorts are named by the academic year in which they finish year 11 or year 13, and Sisra moves the labels on each August.
Import student data
Section titled “Import student data”Student data tells Sisra who is in the cohort, their classes and their filter values. Use the same Student ID for a pupil or student in every file for the cohort, such as their exam number or admission number.
- Export the cohort’s student data from your MIS, with one row for each pupil or student in each class.
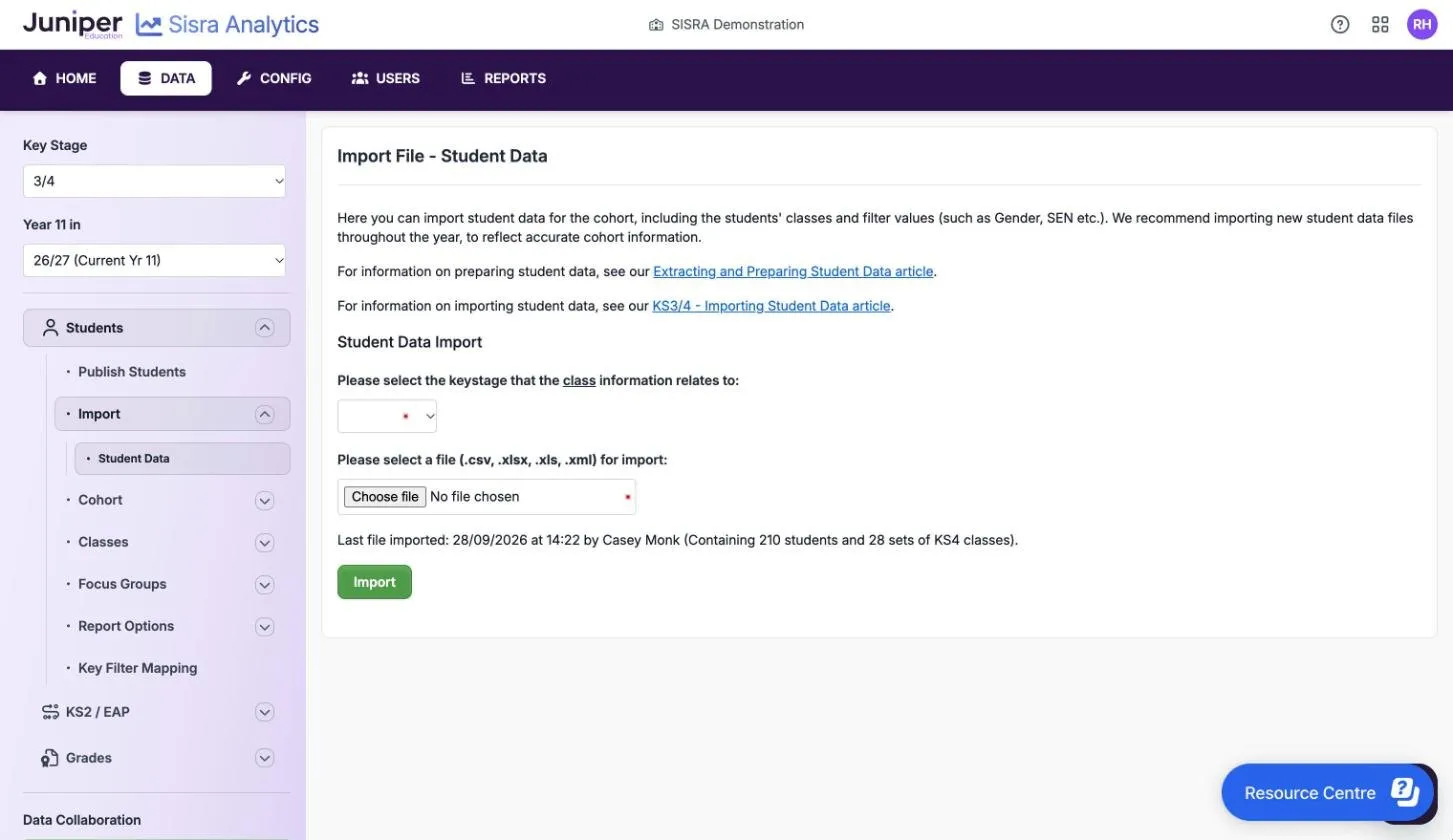
- Select Students, then Import > Student Data.
- At KS3/4, choose whether the classes in the file are KS3 or KS4 classes. At KS5, choose Year 12 or Year 13.
- Choose the file and select Import.
- Check that each column is matched, then select Continue with the import.
- Read the file health check, then select Complete the import.
The Students List opens, with the number on roll. A cohort can hold up to 650 pupils or students. For a current year 13 cohort, import a year 12 file and a year 13 file. Import student data explains each step.
Upload baselines and create EAPs
Section titled “Upload baselines and create EAPs”Baselines are starting points. Expected Attainment Pathways (EAPs) group pupils and students by a baseline and can set the grade expected at each term. Every qualification needs an EAP, because the EAP you choose for it on the Matching page sets its grade method.
At KS3/4
Section titled “At KS3/4”- Select KS2 / EAP, then Uploads > KS2 / Baseline.
- Select Upload Grades File and upload the pupils’ KS2 scaled scores in English reading and maths.
- Select Baselines > Baseline Management, then Edit.
- Set the Grade Type to Scaled Scores, nominate both subjects in the Core column, and select Save.
- Upload any other baselines your EAPs will use, such as targets, and set them up in the same way.
- Select EAP > EAP List, then Create EAP. Create at least one EAP for each kind of grading in the cohort, such as GCSE 9 to 1 and BTEC.
The 24/25 and 25/26 cohorts took no KS2 tests. See Progress 8 for cohorts without KS2 results.
At KS5
Section titled “At KS5”- Select KS4 / EAP, then Core Baselines > Import Core Baselines.
- Import students’ KS4 core baselines: KS4 APS GCSE (A8 Pts), KS4 APS All (A8 Pts), Prior English (Challenge Points) and Prior Maths (Challenge Points).
- Select EAP / Baselines > Uploads, upload any other baselines your EAPs will use, such as targets, and set them up in Baseline Management.
- Select EAP, then Create EAP. Create at least one EAP for each kind of grading, such as A level, AS level and the Extended Project.
Set up EAPs for KS3/4 and Set up KS5 baselines and EAPs give the full steps. EAPs, flight paths and on track explains how Sisra uses them.
Upload grades
Section titled “Upload grades”Grades go into data sets and assessment collections, and each becomes its own report when you publish it:
- a data set holds one full set of grades, such as targets or mocks, and the Exams data set holds official results only
- the Assessments area holds an assessment collection for each data drop, such as Y11 Autumn, and you can publish up to two collections a term
To add an assessment collection:
- Select Grades, then Uploads > Assessments.
- Select Create Assessment Collection.
- Enter a Collection Name:, choose the Grade Type: and Term:, and select Create.
- Select Upload Grade File, choose Broadsheet or Grade List, and choose the file.
- Enter a File Title: of 2 to 20 characters and select Upload.
- Check the column mapping, read the file health check and finish the upload.
Choose the grade type Attainment for working-at grades, the grades pupils or students are working at now, and Predicted for predictions. The Term, such as Year 11 Term 1, decides which of the EAP’s expected grades the collection is compared with.
For a data set such as targets, select it under Uploads, choose its term and grade type, then select Upload Grade File. The first file that names a qualification creates it. If a later file uses a different name, Confirm Upload Qualification Names asks whether it is new or the same as an existing one.
Upload grades gives the full steps, and Data sets, assessment collections and grade types explains the choices.
Match qualifications
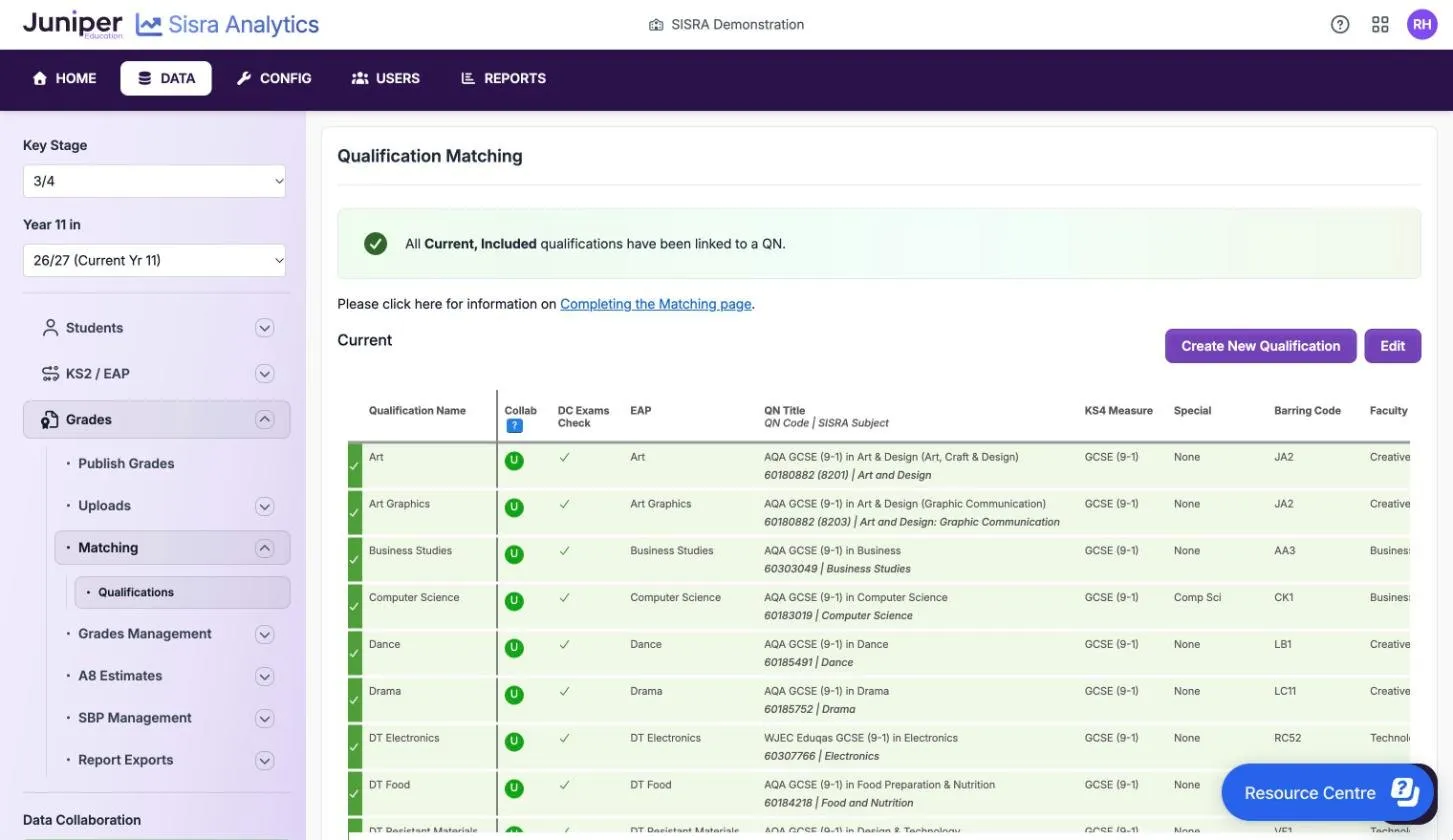
Section titled “Match qualifications”The Matching page links each qualification to an EAP, which sets its grade method. It also links the qualification to its national record, so that it counts correctly in the headline figures.
- Select Grades, then Matching > Qualifications.
- Select Edit.
- For each qualification, choose its EAP.
- At KS3/4, set Use QN to Yes and search QN Title for the qualification number (QN), title or syllabus. At KS5, search Qual Title.
- Choose a Faculty, if you use faculties.
- Select Save Changes.
A row turns green when its qualification is matched, and every included qualification must be green before you can publish grades. A qualification that is not on the DfE’s approved list is matched as unapproved. It appears in subject reports but not in the headline figures.
See Match qualifications in KS3/4 or Match qualifications in KS5.
Assign classes and check the grades
Section titled “Assign classes and check the grades”A pupil or student appears under a class in the reports only when the qualification is assigned to that class’s set of classes. Until then, their grades show as “Not in Class”.
- Select Students, then Classes > Assign Quals.
- Select the plus or pencil icon next to a set of classes.
- Tick its qualifications and select Save.
- Repeat for each set of classes.
- Select Grades, then Grades Management > Manage Datasets.
- Choose each data set or collection in turn, and fix any warning icons.
Manage classes and assign qualifications, Check and correct grades and Warning icons explain these pages.
Map key filters and set up value added
Section titled “Map key filters and set up value added”Key Filter Mapping links your filters to Sisra’s key filters for disadvantaged, gender and SEN. Map them in Students > Key Filter Mapping if your school takes part in Sisra Data Collaboration, or belongs to a trust that uses Sisra Multi-School. Trend reports also need them to filter by these groups. See Map key filters.
At KS5, choose the national value added data in Grades > National Data > Value Added, with Edit VA Data. See Set up KS5 value added.
Publish
Section titled “Publish”Nothing reaches the reports until you publish it. Publish each cohort in this order:
- Select Students, then Publish Students, then Publish.
- Select KS2 / EAP, then Publish KS2 / EAP, then Publish. At KS5, use KS4 / EAP and Publish KS4 / EAP.
- Select Grades, then Publish Grades, then Publish on each data set or assessment collection.
When you publish grades, choose the options in the publish dialog, such as Report Status: and Headlines. Publish data to the reports explains each option and which estimates to choose.
Choose Locked as the report status the first time. Only groups with View Locked Reports, such as Admin, can then open the report while you check it.
Publishing joins a queue and runs in the background. The dialog shows your place in the queue, then Publishing Complete.
See the reports
Section titled “See the reports”When publishing finishes, select Go To Reports. You can also open the reports at any time:
- Select REPORTS, then KS 3/4 or KS5.
- Select the cohort, such as 26/27 (Yr 11).
- Select the report you published.
Before your school’s first publish, REPORTS is greyed out. Check the headline figures against what you expect, then change the report’s status to Checked so that staff can see it. You can change a status without publishing again: see Report status and the results embargo.
Open the KS3/4 reports and Open the KS5 reports explain the reports home page.
Give staff access
Section titled “Give staff access”Staff sign in through Juniper Portal. Invite them there and choose a role, which sets their authority group in Sisra. If some staff need more than User but less than Admin, create a custom authority group first.
See Give staff access to Sisra and Authority groups and permissions.