


 Sisra Analytics
Teacher assessment
Record formative assessment
Formative assessment in Sonar records how each pupil is getting on with individual curriculum objectives, such as “Retell some stories orally”. Use Primary Formative for years 1 to 6 and EYFS Formative for nursery and reception. Both show what has been taught and where the gaps are, so you can plan what to teach next.
The two pages work in the same way, and use Sonar’s older screen design.
Before you start
Section titled “Before you start”You need:
- an edit role, such as Full Edit or Partial Edit
- objectives set up for the subjects you want to assess
Your school chooses each subject’s objectives on Objective Sets (Assessment settings). The default is the Sonar Curriculum, written by education specialists at Juniper Education. Changing a subject’s objectives later archives the codes already recorded against them, so settle your content before teachers start.
Open the page
Section titled “Open the page”- Go to Assessments.
- In the Teacher Assessments card, select Primary Formative or EYFS Formative.
- In the Select Pupils box, choose a year group from the Year Group list or a class from the Class list.
- Select Load Assessment.
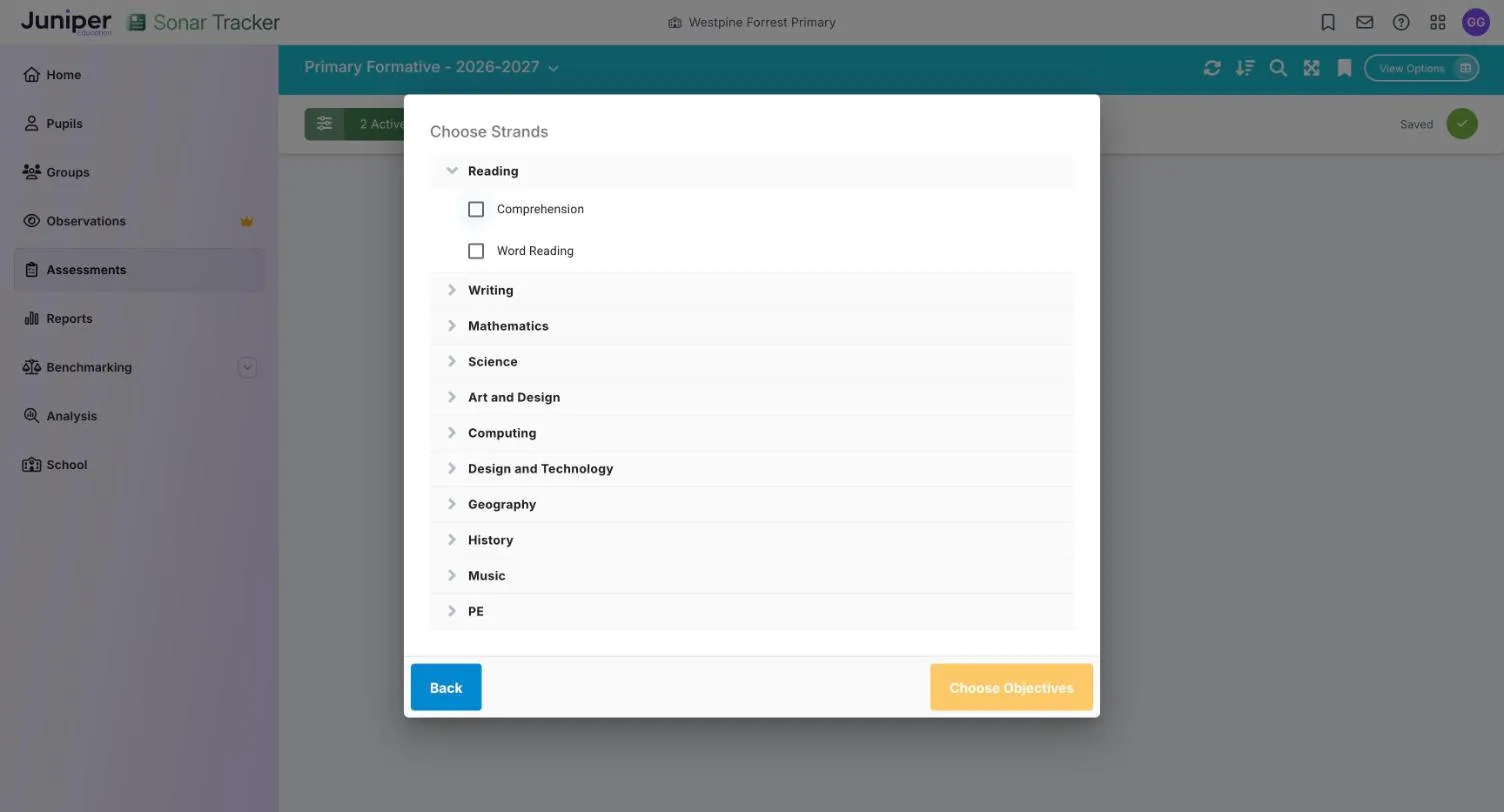
- In Choose Strands, open a subject and tick one or more strands, such as Comprehension under Reading.
- Select Choose Objectives.
On EYFS Formative, Choose Strands lists the seven areas of learning, each with its own strands. For example, Communication and Language includes Observation Checkpoint and ELG (early learning goal).
Find your way around
Section titled “Find your way around”The coloured bar at the top shows the page and the academic year, such as Primary Formative - 2026-2027. Select it to choose another academic year.
Hover over an icon button in the bar to see its name:
| Button | What it does |
|---|---|
| Refresh data | Reloads the page, for example to show a colleague’s new codes |
| Sort Pupils | Changes the order of the pupils |
| Search | Searches the page |
| Swap X & Y | Swaps rows and columns (Objectives View only) |
| Full Screen Mode | Gives the page the whole screen |
| Bookmark Assessment | Adds the page to your bookmarks on the Home page |
| View Options | Opens the settings in Change what the page shows |
The bar under the header holds:
- the Active Filters button, which opens Pupil Filters (choose filters, then select Apply Filters)
- the term list, Autumn 1 to Summer 2
- the strand button, which reopens Choose Strands
- the Band list, such as Band: 4, or Band: R for reception
- the Saved tick, which confirms your last change has saved
Some filter labels differ from the newer Filters panel, such as In LA Care for In Care and Season for Birth Term (Filter pupils).
Choose a view
Section titled “Choose a view”Curriculum View opens first. The pupils are listed down one side, each with a tick. Each objective has a card with a bar showing how the ticked pupils are spread across the five codes. The bar across the top adds up every objective on screen. Use this view to see what has been taught and where the gaps are.
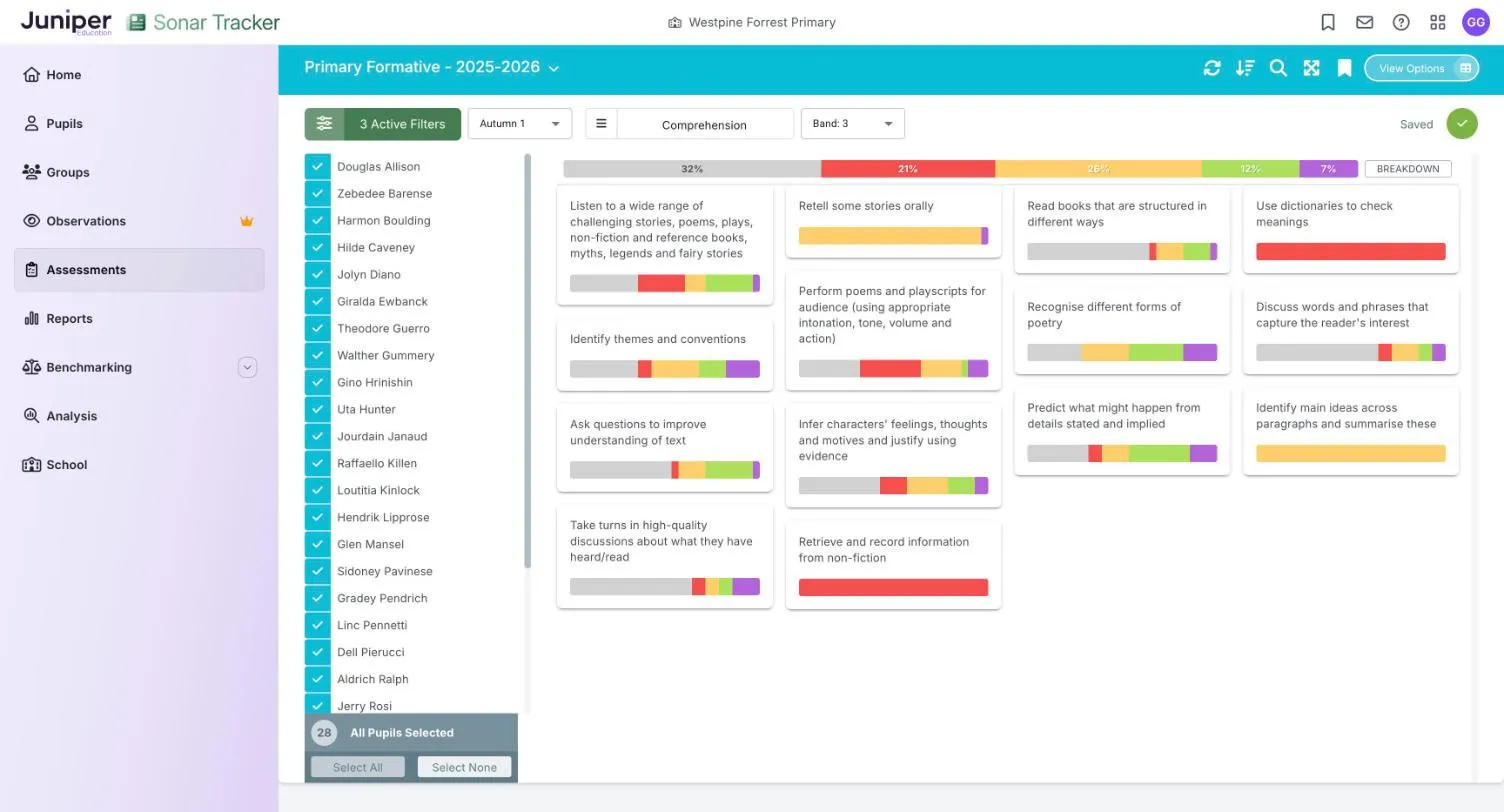
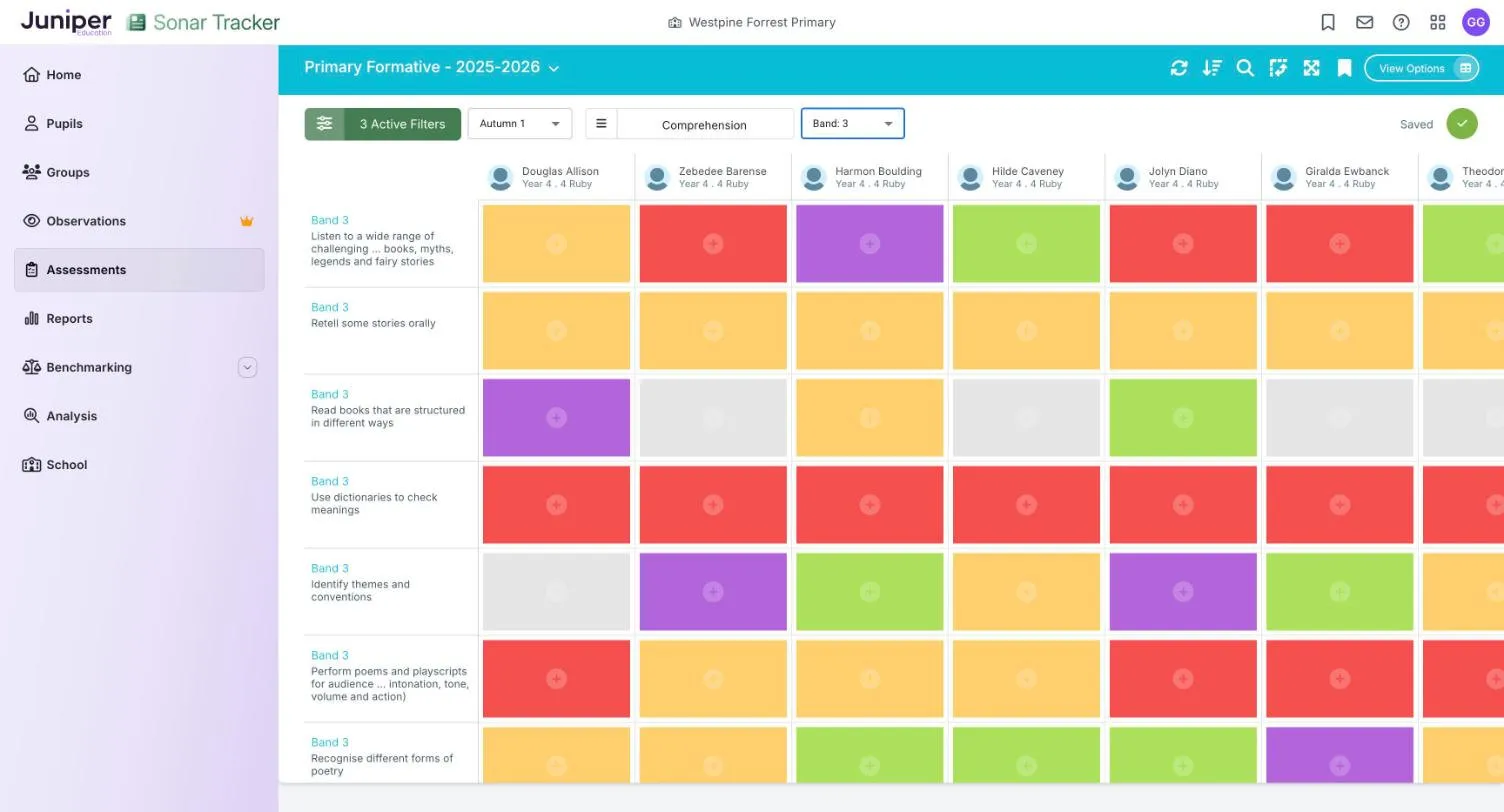
Objectives View is a grid, with objectives down the side and pupils across the top. Each objective shows its band, such as Band 4. Use it to record codes for individual pupils and to fill a row or column.
To switch views:
- Select View Options.
- In the View list, choose Curriculum View or Objectives View.
- Select Update View.
Record a code for one pupil
Section titled “Record a code for one pupil”- In Objectives View, select the cell where the pupil’s column meets the objective’s row.
- In Select Code, choose a colour.
Sonar saves the code straight away, and the Saved tick confirms it.
The five colours in Select Code have no labels. From left to right they are:
| Colour | Code |
|---|---|
| grey | Not taught or pupil was absent |
| red | Taught |
| yellow | Working Towards |
| green | Achieved |
| purple | Greater Depth |
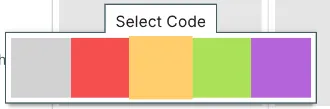
Taught means the objective has been taught but the pupil is not yet working towards it. An objective with no code yet also shows grey, and the bars count it as grey. Agree as a staff what Achieved and Greater Depth mean for your objectives.
Record a code for a group
Section titled “Record a code for a group”Curriculum View suits a group of pupils who are at a similar point.
- Load only the pupils you want to record for, or narrow the list with Active Filters.
- In the pupil list, check which pupils are ticked. Select All and Select None change the ticks.
- Select the coloured bar under the objective.
- Choose a colour.
Then check the result. Select the objective’s text, and the ticks in the pupil list turn into coloured squares showing each pupil’s code. To correct a pupil, select their square and choose another colour, or change their code in Objectives View.
Fill a row or column
Section titled “Fill a row or column”Bulk Fill works only in Objectives View.
- Select a pupil’s name to fill their column, or an objective to fill its row.
- Choose a colour.
- Select Bulk Fill.
To cancel, select anywhere outside the menu.
Read the colour key with Breakdown
Section titled “Read the colour key with Breakdown”In Curriculum View, select Breakdown to see the colour key. It gives each colour’s name and its share of the codes on screen, and it is the only place the page names the colours.
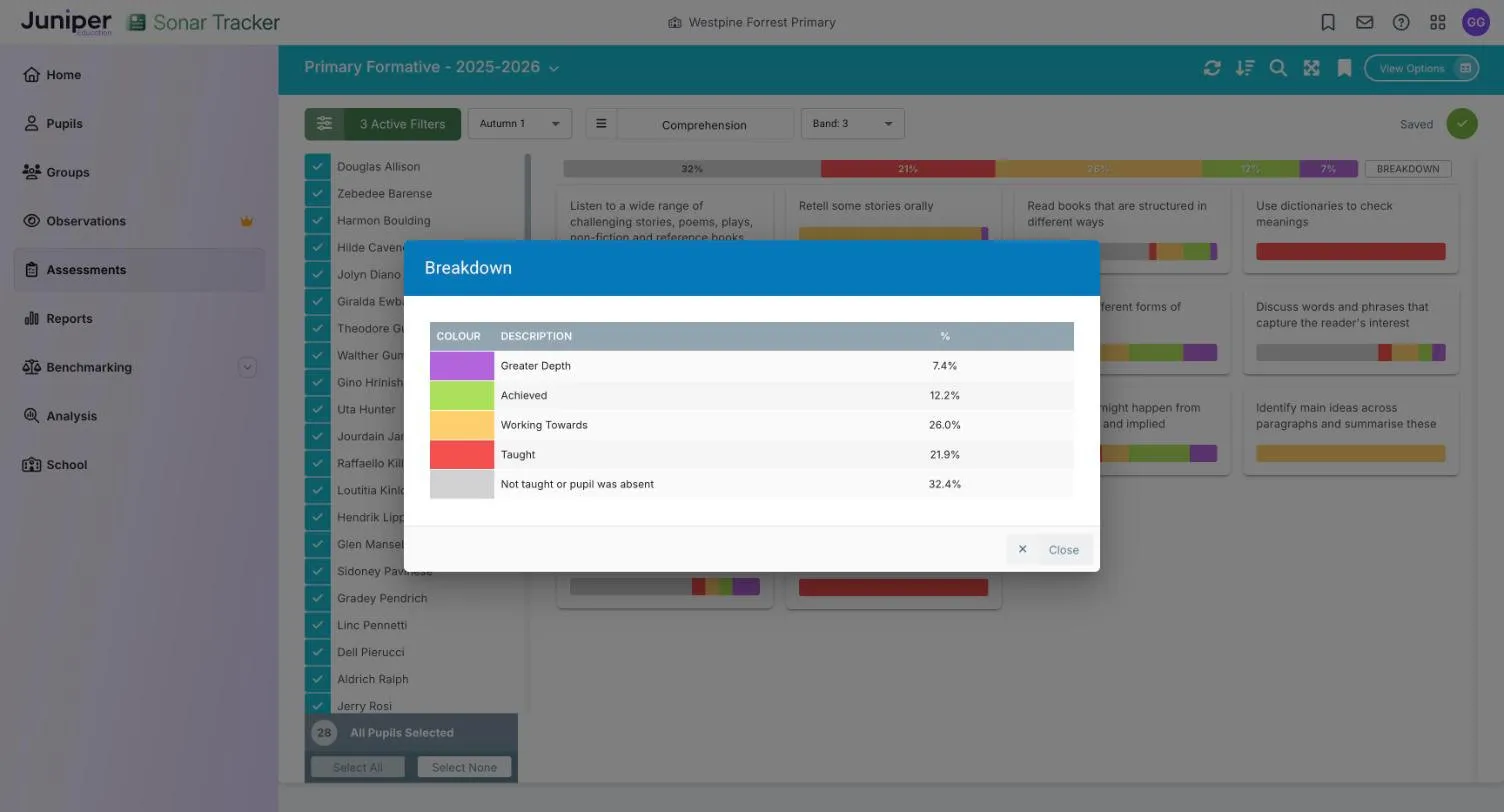
Use the colours to spot gaps when you plan. A bar that is mostly grey marks an objective not yet taught. A lot of red or yellow marks one that may need teaching again.
Change what the page shows
Section titled “Change what the page shows”View Options holds these settings. Some only appear when Objectives View is chosen.
| Setting | What it does |
|---|---|
| Input Style | Sets how you pick a code: Dropdown or Touch |
| Use Pupil Friendly Objectives | Shows objectives in child-friendly wording, where your objective set has it |
| Show Band | Shows the band above each objective |
| Display expanded objectives | Shows long objectives in full instead of shortened |
| Show Pupil Images | Shows pupil photos |
| Show Pupil Year Group and Class | Shows each pupil’s year group and class under their name |
| Show ARE Colours | Turns the age-related expectations (ARE) colours on or off |
To hide some objectives, open the Objective Filters tab and untick them. Select Update View to apply your changes.
Look at an earlier year
Section titled “Look at an earlier year”Select the page title to choose another academic year, then choose the term from the term list. The Band list does not change with the year, so choose the band again. For example, this year’s year 4 pupils worked on Band 3 objectives last year. With Band: 4 still chosen, last year’s grid stays empty.
Where formative codes appear
Section titled “Where formative codes appear”Your formative codes also appear in:
- Triangulate on the summative pages (Check other evidence before you decide)
- Primary Triangulation of Data Analysis, as a block of percentages for each pupil (Triangulation of Data Analysis)
- Cohort Formative Analysis, which shows which objectives each pupil in a class or year group has met (Formative reports)
- Formative Progress Analysis, which compares the share of a band’s objectives each pupil has achieved at two points
- parent reports, which suggest up to 3 targets for each subject from objectives coded Working Towards or Taught (Create parent reports)
In Triangulate, Taught and Working Towards count as below, and Achieved and Greater Depth as at or above. The Pupil Data Export Wizard does not include formative codes.
If something goes wrong
Section titled “If something goes wrong”The grid is empty after you change the academic year. Choose the band your pupils were working in that year from the Band list.
Choose Objectives stays greyed out. Tick at least one strand in Choose Strands.
You see “No objectives for chosen strands. Change strands to include some objectives”. The strands you chose have no objectives in the band, or the subject has no objective set. Choose other strands, or ask your assessment lead to check Objective Sets.
The page is slow or does not load. Load one class and a few strands at a time.
You cannot change a code. Your role may be read-only, or your role may only edit the current academic year. Ask your Account Owner or Account Admin.